Add Row
Add Element
cropper
update
Home Fix Channel
update
Add Element
  • Home
  • Categories
    • Industry Trends
    • Technology
    • Industry news
    • Consumer Reviews
    • Home Services Tips and Advice
    • Home Improvement scams
    • Home Renovation
    • Home Improvement
March 20.2025
2 Minutes Read

Transform Your Space: How to Build a Shower Pan for Home Improvement Success

Shower pan construction with wire mesh and wooden frame

Understanding the Essentials of Shower Pan Construction

Shower pans, often seen as a mere functional element, actually play a crucial role in the aesthetics and utility of a bathroom. For those in the home improvement industry, offering a custom-built shower pan can not only enhance a customer’s satisfaction but also reflect the craftsmanship of your services. Unlike factory-made options, building your own allows for personalization in shape and size, adapting uniquely to each client's space.

The Step-by-Step Process for Crafting Your Shower Pan

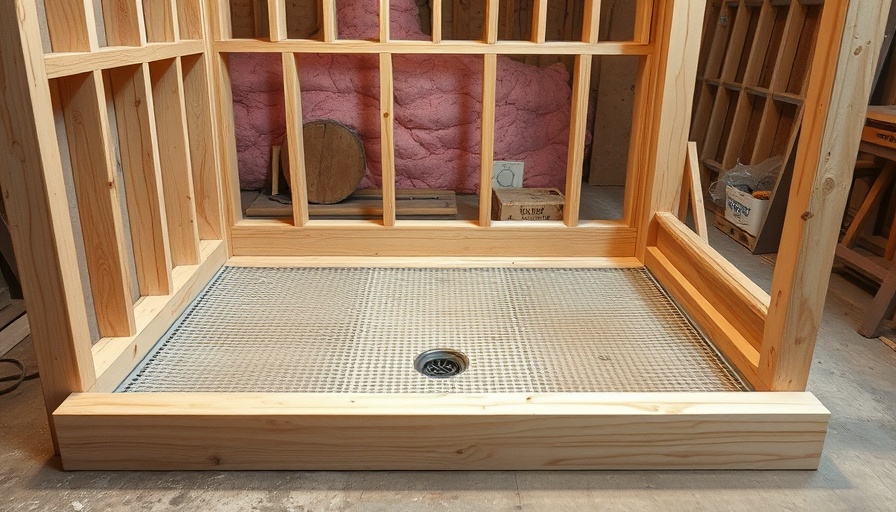
The process begins with the framing of the shower pan area, ensuring the structural integrity to support what will soon become a beautiful and functional element of the bathroom. Using 2x6 inch boards, frame the shower area while considering the curb height—a critical feature keeping water contained. Next, lay down tar paper to protect against water seepage from the mortar, which is paramount in ensuring a long-lasting shower structure.

Why a Custom Shower Pan Is Worth the Effort

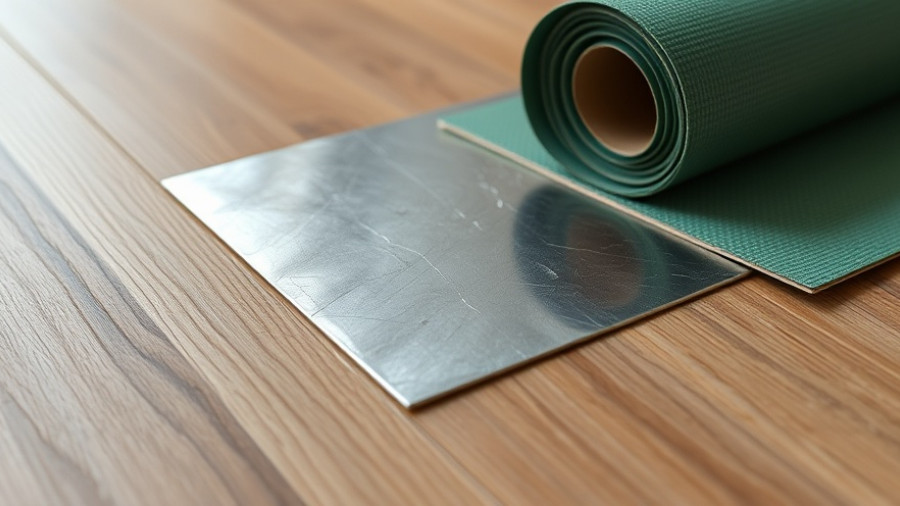
Creating a custom shower pan not only allows for flexibility in design but presents numerous practical benefits. The water-resistant layers, including a top slope and a tile finish, promote longevity and easy maintenance while providing options for stylish tile choices that align with modern trends in home improvement. As homeowners increasingly invest in high-quality finishes, a tailored shower pan can increase the overall appeal and value of a property, motivating clients to prioritize durable, stylish solutions over standard prefabricated options.

Key Tools and Materials You Will Need

Equipping yourself with the right tools is crucial before starting on your shower pan project. Essential materials include a circular saw, tiles for the aesthetic finish, and various simple labor tools like hammers and mixing trays for mortar. Ensuring you have everything before commencing can prevent delays and provide a smoother experience for both the builder and the client.

Making a Case for DIY Over Pre-Fab

While pre-fabricated shower pans are convenient for their speed and uniformity, they lack the uniqueness and adaptiveness that a DIY project offers. Customized solutions resonate more with homeowners looking to make a personal statement in their homes. Furthermore, emphasizing the creativity involved in crafting these shower pans can differentiate businesses in a competitive market, attracting clients who value distinct and bespoke home improvement solutions.

Understanding the technical construction while embracing artistic expression is key in delivering shower pans that are not only functionally sound but also visually stunning.

Time to Get Started!

If you’re ready to enhance your services and provide customers with unique, high-quality shower solutions, consider diving into the world of DIY shower pan construction. Start by gathering your materials, outlining the project timeline, and ensuring you’re prepared to take on this exciting challenge. The end result will not only satisfy your clients' needs but also elevate the standard of your offerings in the highly competitive home improvement field.

Home Improvement

Write A Comment

*
*
Related Posts All Posts

Transform Your Toilet: Effective Ways to Remove Hard Water Stains

Update Say Goodbye to Hard Water Stains: Proven Tips for a Spotless Toilet Are those unsightly hard water stains refusing to budge? Don’t worry; you’re not alone! Hard water can transform your bathroom from a lovely retreat into a neglected space with yellowish stains, rust rings, and annoying mineral deposits. Fear not, as there are effective strategies to keep your toilet and other home fixtures shining bright. Here’s a fun and friendly guide on how to tackle those pesky toilet stains, ensuring your home looks its best! The Power of White Vinegar as a Stain Buster First up is the household hero, white vinegar. Not only is it affordable, but it’s mighty against hard water stains. Start by using a plunger to remove excess water from the bowl, making it easier to scrub those stains. Simply pour white vinegar around the inner rim, let it sit overnight, and scrub with a toilet brush come morning. For stubborn stains that refuse to yield, a pumice stone may do the trick—just be gentle to avoid scratches! Baking Soda: Your Best Friend for Bathroom Cleaning Next on our list is baking soda. This natural cleaner pairs excellently with vinegar for stain removal. Simply scatter a cup of baking soda in the bowl after the vinegar sit-time, and watch as the bubbly reaction lifts the stains. Allow it to rest for about ten minutes, then scrub away for a sparkling finish. Exciting Alternatives: Borax and Essential Oils If you’re looking to spice things up a bit, consider using Borax along with some refreshing essential oils. Mix three-quarters of a cup of Borax with a cup of white vinegar, adding a few drops of lemon and lavender oils for a delightful aroma. Not only do these oils leave your bathroom smelling fresh, but they also add antimicrobial benefits to the cleaning process! Common Household Items That Do Wonders And let’s not forget that you've got other secret weapons in your pantry! You can use Coca-Cola for cleaning thanks to its acidity, or grab some WD-40 to break down tougher stains. It's a versatile fix that doubles as a rust remover too. Why a Clean Toilet Matters for Your Home Clutter and dirt can stick to your comfort, and a clean bathroom provides a nice boost to your overall home environment. As a home improvement enthusiast, knowing how to maintain all aspects of your residence, including stain-free toilets, not only enhances the value of your property but also elevates your overall well-being. Let’s face it—no one enjoys using a dirty restroom! Take Action Today! Now that you have these fantastic tips at your fingertips, it’s time to roll up your sleeves. Whether you’re a home improvement enthusiast, small business owner in the cleaning industry, or just someone who values a clean bathroom, these methods can transform your home significantly. Embrace these cleaning secrets and say goodbye to unsightly stains once and for all!

Never Let Your Water Heater Pilot Light Go Out Again: Easy Fixes

Update Understanding Your Water Heater's Pilot LightHave you ever been jolted from a comforting shower by the sudden chill of an extinguished water heater pilot light? You're not alone! Many homeowners face this frustrating issue, especially during the colder months when consistent hot water is essential. But fear not; there are simple solutions to keep your pilot light from going out repeatedly.Common Causes of a Flickering FlameFirst things first: let’s dissect the common culprits behind a stubborn pilot light that refuses to stay lit. Understanding these factors can empower you as a homeowner to take charge of your water heater.Thermocouple Troubles: This little gadget ensures safety by shutting off gas flow if the pilot light goes out. If it's malfunctioning, it might be time to replace it, or a thorough cleaning might suffice. Make sure you power down the system before tinkering!Combustible Air Shortage: Surprisingly, your water heater needs air to function properly. Dust and debris can easily block air intake, leaving you with a flickering flame. Regularly check your water heater's area to keep it clean and dust-free.Dirty Pilot Tube: A pilot tube clogged with dirt can starve the flame of fuel, causing fluctuations and eventual extinction. Grab a slender needle and give it a good cleaning!Main Control Valve Malfunctions: Should all else fail, consider checking the main control valve, which regulates gas flow. However, this might require a professional touch.Taking Action for a Toasty HomeKeeping a close eye on your water heater can prevent discomfort during those brisk winter months. Regular maintenance checks are an easy investment that pays off. If you find yourself in deep water with persistent issues, don’t hesitate to consult a professional. They can help troubleshoot and fix complex problems that DIY efforts may not resolve.Why This Matters to Home Improvement ProsIf you're in the home improvement industry, understanding the intricacies of common household systems can set you apart. Educating your clients about simple fixes can enhance their home experience, increase trust in your services, and ultimately drive business growth. By becoming a trusted resource, you can turn problem solvers into repeat clients!Your Next StepsDon't let technical troubles keep you up at night. Addressing pilot light issues can streamline your home services and create a warmer, more welcoming atmosphere for your clients. Happy heating!

Transform Your Home: How to Eliminate the Dirtiest Spots You Overlook

Update The Hidden Dirt Traps Lurking in Your HomeMaintaining a pristine home is a goal for many, yet even the most diligent homeowners often overlook critical cleaning spots. These hidden dirt traps don’t just affect aesthetic appeal; they can harbor allergens and bacteria, posing risks to your family's health. It’s time to shine a light on the areas that need your attention and how you can tackle them effectively.Why Cleaning Is Not Just AestheticsWhile vacuuming carpets and scrubbing countertops are vital routines, many neglect less visible areas where dust and grime tend to accumulate. Ignoring these spots can lead to a decrease in indoor air quality and an increase in allergy triggers. Performing deep cleaning in these overlooked locations doesn’t just refresh your home’s look—it can significantly improve air purity and minimize potential health risks.Top Areas You Need to AddressCeiling Fans and Light Fixtures: The Dust CollectorsMost people don't realize that ceiling fans and overhead lighting are notorious for gathering dust, pollen, and pet dander. These pollutants can circulate through your home every time the fan is turned on, potentially triggering allergies. The trick? Use a pillowcase to wipe each fan blade clean.Baseboards and Trim: Your Home’s Forgotten ArchitectureBaseboards and trim work are often dust magnets, collecting debris that can lead to mold in humid environments. Regular cleaning with a damp cloth and vacuuming are essential to keep these areas neat. Don't forget to include them in routine cleaning schedules!Window Tracks and Sills: Out of Sight, Out of Mind?Even if your window glass gleams, the tracks and sills underneath may hide unwelcome visitors like dead insects and mold spores. To tackle this issue, use a vacuum attachment followed by a vinegar solution clean-up to eliminate the debris effectively.Conclusion: Don’t Overlook Home HealthInvesting time into cleaning these hidden spots not only assures a cleaner aesthetic but pays dividends in health benefits. So, whether you're a homeowner or a business in the home improvement industry, prioritizing these cleaning areas can create a healthier living environment. Start actively addressing these overlooked areas and witness the positive impact it brings to your home!

Terms of Service

Privacy Policy

Core Modal Title

Sorry, no results found

You Might Find These Articles Interesting

T
Please Check Your Email
We Will Be Following Up Shortly
*
*
*